Many people spend $$$ on dSLRs such as the Nikon D850 or Sony’s A7Riii with specialist lenses, strobes, housings, ports, focus lights and light modifiers. With some careful selection of subjects and creative use of torch light, you can make good photos with a point and shoot camera such as the Olympus TG4 with a housing and a torch. If possible use a torch with different power settings and a variable beam angle.
Advantages
Small and light. It is much easier to carry if you are shore diving.
You can get the TG4 into smaller spaces than a dSLR, especially if you can stretch out an arm while holding onto your camera
Using a torch make it much easier and faster to change your lighting. Using strobes improves the quality a little but loses the advantages of flexibility and small size!
It is much cheaper. A Nikon W300 plus torch or Olympus TG5 plus housing and torch will cost between 5% to 15% of a dSLR set up.
Disadvantage
Sometimes you need 3 arms if you require both hands on the camera to ensure a steady shot
The smaller sensor on a point and shoot camera introduces a lot of noise. Getting rid of this in camera or on a computer in Post Processing will remove some of the detail
The cheaper plastic housings are not as robust as aluminium housings. If you dive a lot your plastic (polycarbonate) housing will tend to crack and leak thereby ruining your photos!
Wide angle shots of reefs tend not to work very well with a point and shoot camera
Tips for making great pictures
Patience. Avoid taking a few quick shots from where you see the subject. Avoid spooking it and move slowly into position to get more interesting angles!
Don’t try to take a photo of everything you see. Focus on subjects that are in good positions and interesting!
Medium sized subject (2cm to 20cm long) lead to the best results.
Try to take photos when the subject is doing something interesting such as a frogfish yawning.
Using your torch
Don’t shine your torch directly at the subject. Instead try to catch the subject with the edge of the beam.
Experiment with holding the torch in different places: to the side, above or in front of the subject. If the subject is transparent, try lighting it up from behind.
If you torch has different power settings or beam angles, play with the settings to see which works best for each shot!
Using your camera
Minimise the use of the zoom and get closer to your subject to get better colour from your flash
The Olympus Microscope mode is really good for small subject as it allows you to get much closer. Remember to change your flash setting to fill otherwise you will lose the colour!
External macro lenses can give you more detail but are not so good for larger subjects as you won’t be able to focus from further away.
Consider your composition.
Don’t take photos from above. Pictures of the top of people’s heads aren’t interesting either.
Try and focus on the subject’s eye. Put the centre focus square on the eye, half press the shutter then move the camera to compose your shot.
Don’t always put your subject in the centre.
Include some of the surrounding coral or vegetation to add interest to your pictures.
Try different perspectives! Getting to your subject’s level can greatly improve your pictures. Also try different angle: in front, slightly to the side or sometimes slightly above if your subject has an interesting pattern such as a marine flatworm.
Examples
All photos below were taken by me using an Olympus TG4, Olympus PT-056 housing and FIX Leo torch with 4 light setting for both white and red light
A side on shot from sand level to show the colour and marking of this painted frogfish. Catching the open mouth gives this frogfish a more interesting expression!
A front on traditional portrait. of a Painted frogfish You can really see the texture of the skin, teeth and the outstretched arm. This is taken from slight below to get a more interesting background so the frogfish stands out more. I was also quite close so the background is blurred!
A pretty Warty frogfish. You can see the eye is clearly in focus! Also the body stretches around to make the picture more interesting
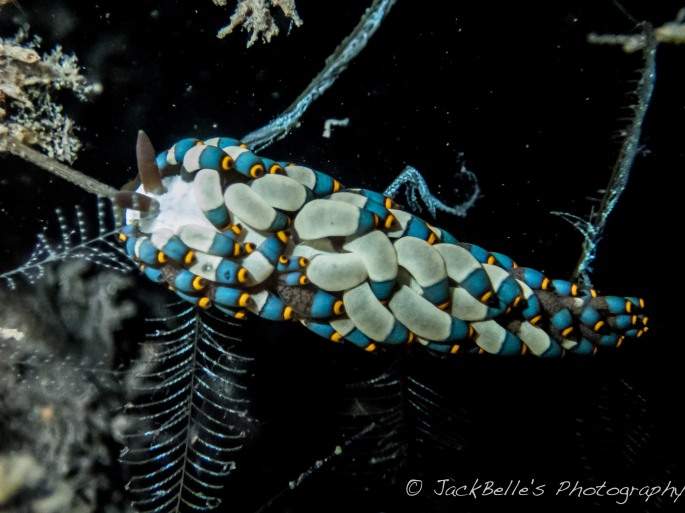
A really small Eubranchus sp. nudibranch that was about 1cm long. I was really close with some optical zoom to get this result. I took several shots from different angles so I could clearly see where the head was (left side). I also varied the angle of torch light to get the best lighting effect.
A hairy Melibe sp. nudibranch. I moved the light around to try and light the body as well as the top of the nudibranch. Getting low helped to add emphasis on the subject and separate it from the background.
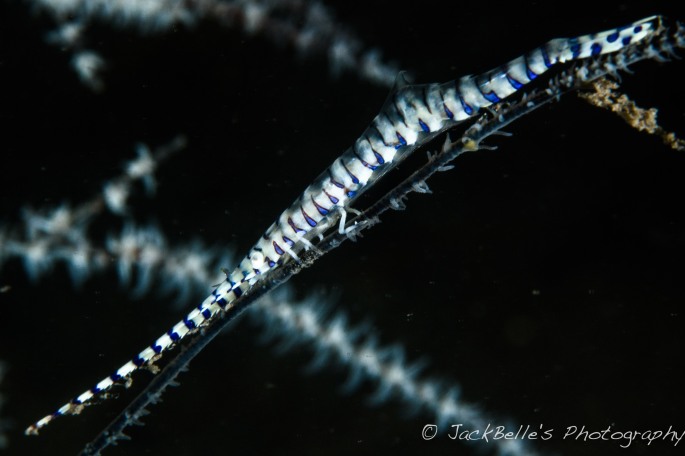
A pair of Jorunna funebris nudibranchs mating on a night dive. Getting low helped place the emphasis on the couple. I had no optical zoom so I could get as close as possible. The torch in the background adds interest.A short fin squid on a night dive. I was careful not to scare it away as it was attracted to my light and surrounding fish. I had to be careful to catch the squid with the front edge of my torch light to avoid lighting up all the small fish as well.
his is a Polybranchia orientalis marine slug and is slightly transparent. I held my torch slightly behind it to try and string out the colours better.
This Limaria sp. bivalve was walking on the sand. I had to get low so that was formed the background and emphasised the subject.
It is possible to make great underwater pictures with a point and shoot camera such as a TG4, but sooner or later you will discover the limitations of this type of camera:
The small sensor has a lot of noise. Eliminating this noise smoothes out the details in the photo
Subjects that are hairy appear strange due to the elimination of detail such as hair!
It is difficult and time consuming to get key features such as eyes in focus
The camera doesn’t focus well on subjects that are hairy, thin or transparent. You can waste a lot of time trying to get just 1 photo in focus!
Small subject are impossible since the camera can’t be put close enough resulting in the subject appearing tiny
It is difficult to light up subjects with complex shapes correctly. with a single light This includes many shrimps, octopus and frogfish!
Avoiding these problems can be expensive since they involve purchasing and mastering interchangeable lens cameras and other components such as:
Cameras including the Nikon D850, Sony’s A7RIII and Olympus EM1 mark II
Specialist macro lenses. Longer e.g. 100mm is better for small subjects
Underwater housing and ports for each lens which can be more expensive than the cameras and lenses
Strobes and flexible arms to allow you to accurately position each strobe
Focus lights to help the photographer focus on the correct area. Cameras these days normally don’t need much help in poor light
Light modifiers to focus the strobe light onto a specific area to make a subject stand out. These can be difficult to point at your subject especially if it is moving. You can spend a lot of time and attempts trying to get one good photo!
Diopters to provide additional magnification for small subjects. These frequently reduce image quality.
Here are some advantages and disadvantages for interchangeable lens cameras
Advantages
The image quality is better with far more detail than can be generated with a point and shoot camera. This shows the texture of skin, hair and other features.
The focus point on many cameras can be easily and quickly moved to where the photographer wants it. This is good for composition and helps with difficult subjects as if you focus on the eye, the other parts in the same plane will also be in focus.
The settings on cameras can be easily adjusted without diving into a menu
The lighting can be moved precisely to create the lighting effect desired by a photographer
Disadvantage
Good quality housings with a wide range of ports are not available for many cameras. There are also some basic housings from manufacturers such as Meikon that only support standard kit lenses. This is an important consideration if you require good image quality which requires using the correct macro or wide angle lens, or if you camera does not have an underwater housing!
Heavy and cumbersome. It can be impossible to manoeuvre the camera into a position to take a picture of a shy subject!
Costs increase quickly for ever smaller improvements in quality
It is time consuming to take the perfect photo, frequently taking up a large portion of a dive. This is very boring for companions of the photographer!
Tips for making great pictures
Patience. Observe the scene and pick the best angle for your shot. Move slowly into the best position to get more interesting angles and avoid scaring the subject!
Work the scene! Change your position and settings to create several good shots to choose from!
Don’t waste time on subjects in bad positions.
Try to take photos when the subject is doing something interesting such as a frogfish yawning.
Using your strobes
Lighting is key to creating great photos. Learn to set each strobe power manually as well as change the direction and position of each one independently.
Angle your strobes so you catch the subject with the edge of each beam. This creates a more attractive light.
Experiment with the strobe position to create an even or asymmetric lighting effect. Choose the best photo on a bigger screen rather than on the camera!
Using your camera
Use manual mode so you have full control over the Aperture, Shutter Speed, ISO and exposure compensation. Adjust these to get the exposure you want for each photo!
Learn how to quickly move your focus point to where you want it. This is usually done by a joystick or the directional buttons on a keypad on the camera
Using continual focus will help to track the subject if it moves a little!
Use back button focus to set your focus. Half depressing the shutter button can also be used but will change your focus for each photo and increase the number of badly focused photos!
Check you photos if you have a dSLR to make sure you have a correctly focused and exposed photo before you move to a different subject. With a mirrorless camera, you can do this before you take a photo thereby saving time.
External diopter lenses can make small object larger but degrade the photo, ofter resulting in a foggy appearance!
Consider your composition.
Try and create a low angle for the photo to naturally create a black background without losing the vibrancy of the colours. You can force a black background by carefully positioning your strobes but the colour will often look washed out and the subjects under exposed!
Move the focus to the subject’s eye as viewers will expect this to be in focus. You can place the eye in the centre of the photo or use the rule of thirds to place it to one side, top or bottom.
Don’t always put your subject in the centre. Use the rule of thirds to create more interesting photos! Sometime the body can create interesting shapes for your photos.
Include some of the surrounding coral or vegetation to add interest and colour to your pictures.
If your subject is looking in a particular direction, leave some space on that side of your photo. This will make your photo more interesting as it will lead the viewers eye in the same direction. This can be extended to the direction in which your subject is pointing.
Examples
All photos below were taken by me using a Nikon D7200, Sea&Sea housing and two YS-D2 strobes, 60mm Nikon micro lens and Fix Leo focus light
A thorny seahorse with the focus on the eye. f16, 1/250, ISO 100A pair of Harlequin shrimp feasting on a starfish! Purple is an unusual colour for these critters! f7.1, 1/125, ISO 100Coryphellina exoptata nudibranch with some surroundings to add interest and a black background to emphasise the colours. f25, 1/125, ISO 100Trinchesia species nudibranch with its “face” in the bottom right hand corner and body curling to the top left corner, f13, 1/250, ISO 400Painted frogfish yawning. f14, 1/250, ISO 400Favorinus tsuruganus nudibranch eating the eggs of a different species. f22, 1/125, ISO 100Reticulidia halgerda nudibranch with an open aperture to provide background colour rather than black which would blend in with the body colour! f5.6, 1/125, ISO 100Blue ribbon eel with a black background generated by the hole and camera settings. f22, 1/125, ISO 100Blue ringed octopus with a mostly black background. f25, 1/125, ISO 100A Tiger shrimp. The low angle from which this picture was taken creates a black background without losing the vibrancy of the colours. f22, 1/125, ISO 400